Showing posts with label 6th Grade. Show all posts

6th Digital Arts: Legendary Creatures


Myths and legends have entertained humans for thousands of years. These stories may be humorous, scare us, or teach us lessons.

You will use Photoshop to create a picture and then write a story about a legendary creature. These creatures are imaginary (or are they?), like Bigfoot, the Loch Ness Monster, or the Chupacabra. Use this post to fill out the questions on your worksheet.

What could your Legendary Creature be like? Look at these links for some examples:
1. Photoshop animals
2. More Photoshop creatures. 
These are all fake, and were created using Photoshop. Which is your favorite?

Vocabulary:
1. Go to Word Central. Write the definitions for the following words:
mythological
legend
bigfoot
Loch Ness Monster
allegory
fable

2. Go to this List of Cryptids. Pick three. Write down the names, other names, status, descriptions, locations. Are there pictures?

3. Fables are made up stories that often have a lesson or moral. Go to this page on Aesop's Fables and chose one to read. Which one did you choose? What is the lesson?

4. Think up your own Legendary Creature. It may be a combination of lots of animals. It may be very big or very small. It may be from another planet or a time long ago.

5. First write the legend of your creature on the page provided (fill the page!). Use correct grammar and spelling. In your legend answer the questions: Where is it from? When did it exist? Where has it been spotted? What does it look like? What does it act like? What does it do? What does it eat? We will then type our stories in Word. Spell check!

6. Now you should use Photoshop to create a picture of your creature. You may want to use pictures of other animals. Make your file 8 inches wide by 10 inches high. Set the resolution to 300 pixels per inch.

P.S. Don't forget what all of your tools do.

Illustrator Tools

Before we begin working in Adobe Illustrator, it is important that you learn some basic tool functions. Follow along on your worksheet to create this picture:
 

What is Copyright Law?

It is very important to understand copyright. When you are working on your projects for this class, you must use copyright-free images or images you have created yourself. You can use drawings you have made, photographs you have taken, or graphics you have created on the computer. You can also use photos on the "Copyright Free Image" link list to the right. YOU CANNOT USE PHOTOS OFF THE INTERNET WITHOUT PERMISSION FROM THE PHOTOGRAPHER. That means no downloading photos from Google image search to use in your project. This is just like stealing. If you change the photo drastically, it is possible to use it (we will talk more about this "fair use" later).

First go to CyberBee and click on the students to answer the questions on your worksheet. Answer briefly in complete sentences:
1. What is copyright?
2. What is public domain?
3. What is fair use?
4. Can I use photographs from the Smithsonian's website?
5. Does it matter how much of a song or video I use?
6. Can I use images and text from a site if it doesn't have the word copyright or the copyright symbol © on it?
7. Can you show your school projects on you website?
8. What is attribution?
9. Who's going to know?
10. Look through the links on the right under "Copyright Free Images and More." Find an image and save it into your folder. To do this, right-click on the image, go to "save image as," and save it to the folder with your name. What kind of picture did you save?


A Fair(y) Use Tale

Art Explorations: Favorite foods wix websites

You will be creating a website about your favorite food.
1. Vocabulary. Write the definitions to the following words:

2. What food group is your food in? Is it healthy or unhealthy?
Research and answer the Survey


3.See the results Here
4. Plan out your website on the worksheet. It must include the following categories

  • Name: How did your food get its name?
  • Recipe(s) for your food or that feature your food. What can be made with your food?
  • History: When (and how) was your food first used by humans?
  • Geography: Where does your food grow or where is it made?
  • Interesting facts about your food


And of course, you website needs lots of pictures.

5. Go to wix.com and log on using the information provided by Ms. Fowler
6. Choose a template.
7. Start designing. Everything in the template must be replaced with your own information.
8. Publish your website with your last name

6th Digital Art: Digital Comic Strips

We will use Adobe Illustrator and Windows Movie Maker to create a digital comic strip movie, then post them online!

Research and Planning
1. Vocabulary
     First, go to toonopedia and write the definition to these words:
  •      frame
  •      storyboard
  •      word ballon
  •      sequential art
2. Brainstorm characters. For ideas, try these links: Veer,  ShutterstockTutorialsColorblok
3. Sketch a storyboard for your comic


Create
4. Create the frames or panels for your comic in Adobe Illustrator. Follow the directions on your worksheet
5. Import jpegs of you files into Windows Movie Maker
6. You can add captions, titles, credits and transitions if you would like too.
7. Save to HAND IN FINAL WORK folder

Present
8. You will present to the class, and some will be chosen to present at the District Art Show in May. We will also post some online.


Critique and Reflect
9. Each student will critique 3 of their peers.
10. Fill out a self-evaluation form and reflection questions.

Art Explorations: Culture Flashcards

For this project we will study graphic design basics, discuss cultural misconceptions, and language.
You will choose a culture meaningful to you; Your own culture or that of someone close to you. Think about what stereotypes or misconceptions people have of this culture? How can you teach them this is untrue?
We will design a language flashcard with a fact on the back. These cards will educate people on both the language and the culture.

Part 1: American Indian Myths and Facts Game
We will play and question and answer matching game that teaches about some common misconceptions about Native American culture.

Part 2: Vocabulary
Go to wordcentral.com to look up these words:
stereotype
misconception
contrast

Part 3: America Meredith
What culture did America Meredith make her artwork about?
What was on the "Spokespeople" cards?
How did Meredith get people to see her cards?

Part 4: Designing Flashcards
Research and Planning: 
1. What cultural group have you chosen?
2. What two basic words will you translate? (pick simple words you can design pictures for, like: hello, happy, sad, love, moon, sun, star, water, earth, bird, etc.)
 * If you need help translating, go to Google Translate.
3. What "myths" and "facts' will you put on the backs of your two cards? One good way to search for simple facts is to go to Google and type in "(your chosen culture) facts for kids."
4. Use symbols, designs, and drawings in your flash cards. Remember these will be printed in black and white. Flashcards should be simple and easy to understand. You can scan any pictures from Ms. Fowler Clip Art books, open any from the symbol picture folder, or try looking HERE. Just remember, don't choose anything that reinforces stereotypes!

Create:
5. Open Adobe Illustrator
6. Open the template Ms. Fowler has set up for you. Go to File > Open > Julie Fowler > Pictures and templates for projects > Flashcards > Flashcard template.ai
7. Design the front of your card in the top box. It MUST have: The english word, the foreign language word, what language it is in (for example "Spanish"), and a picture.
8. Design the back of your card in the bottom box. The back should have a fact that teaches someone something true about the culture.
9. You must use contrast in your design (big to little, black to white, thick to thin, curvy to straight, etc.
10. Remember you are making two different flashcards. Save your designs to the HAND IN FINAL WORK HERE folder.


6th Digital Arts: T-Shirts with a Message

For this project you will be designing T-shirts with a message. You should address an issue you feel strongly about and create a design that reflects your feelings. First complete the Research and Planning worksheets.

Vocabulary
Go to dictionary.com and write the definitions to the following words. Make sure you are choosing the definition that relates to the project.
* communicate    * persuade    * protest   * issue   * propaganda
Research
1. Ms. Fowler will show you some examples of how designers communicate a message.

2. Look through the links below to see how other designers have addressed political or social issues. Pick your favorite three designs and answer the questions on your worksheet.
Artevist
Cafepress

3. Now research a social issue that you would like to address. This link may help. Circle one of the subjects on your worksheet, or write in your own (Love, War, Drugs, Relationships, Bullying, Poverty, Abuse, Consumerism, Global Warming, Gangs, Drunk driving, Texting and driving, Pollution, Health, Pollution, Disease, Racism, Hunger, Gun control, Alcohol Abuse, Smoking, Equality, Homelessness, etc.)
4. Sketch 12 different designs.
5. Choose one design to create in Adobe Illustrator. Show Ms. Fowler to "okay" before you begin on the computer.

Design
1. Open Adobe Illustrator (yellow icon)
2, Open the T-shirt template. Go to Open > Julie Fowler Classroom folder > Pictures and templates for projects > Tshirts > Tshirt template.ai
3. Design you T-shirt. Choose a background color. Use the T tool for typing, the paintbrush and pencil tools for drawing, the shape tools, etc. Ms. Fowler will demonstrate.
4. When you are finished with your design, save it to the HAND IN FINAL WORK HERE folder
** Be original and creative. No copying existing slogans, logos, or characters. Show care and craftsmanship. Have fun!

6th Digital Arts: Typographic Self Portraits

Graphic designers pay close attention to the way letters and words look. They use typography to create interesting designs. For this project, you will use typography (the art of designing or arranging letters and words) in a new way to make a self-portrait!
Vocabulary
Begin by looking up the following words. Go to dictionary.com. Write the definitions on your worksheet.
  1. self-portrait
  2. typography
  3. font
  4. contrast
  5. graphic design
Research
We will look at examples of different fonts and examples of typography in graphic design.
  1. Of the fonts shown, which best reflects your personality?
  2. Look at the design examples. Write down one way you see graphic designers use letters as part of the art, more than just a word.
  3. Write down letters (or numbers or symbols) you may use for the different parts of your portrait.
Create
Create a self-portrait of yourself using only typographic forms (letters, numbers and symbols from your keyboard). 
  1. Open Adobe Illustrator (yellow, "Ai" icon)
  2. Go to File > New, to create a new document. Change the name to "YourLastNamePortrait" (for example FowlerPortrait). Leave the size as "letter."
  3. Use the "T' tool to make a text box. Type different letters and try different fonts.
  4. When you find a letter you would like to use in your portrait, click on the text box with the arrow tool, then go to Type > Create Outlines.
  5. After your letter has been outlined it is easy to change the size, place and direction.
  6. Your portrait should be made in only letters and numbers and use only black and white
  7. Think about how to make it look like you
  8. Save your finished drawing into the "Hand in Final Work" folder. Ms. Fowler will tell you when they need to be finished.

Cyberbullying and Digital Citizenship


1. What is Cyberbullying? A Video Introduction
2. Go to MTV's A Thin Line and answer the questions on your worksheets
3. Watch "Lets Fight it Together." Answer the questions on your worksheet.
4. Look at this example "friendbook" profile and answer the questions on your worksheet.
5. Take the Cyberbullying Quiz
6. Explore some of the resources below


Links to Resources:
NSTeens (Great videos on digital citizenship issues and "real stories")
Digizen (UK)
A Thin Line (an MTV/Facebook collaboration)
WiredKids
Cyberbullying Research Center
STOP Cyberbullying for Tweens
THINKUKNOW (divided by age)
NetSmartz Real Stories (video)

6th Digital Art: Emotion PowerPoint

You will work with a partner to create a PowerPoint presentation on an emotion. You will discover how to visually represent an emotion with related images and words.

Presentations don't have to be boring! For this project we will use PowerPoint to make a presentation that is interesting, artistic and entertaining.

Vocabulary
go to Word Central to find the definitions for the following words.
presentation:
emotion:
represent:
visually:
consistent:

Research
Here is an example of a good PowerPoint:
Did you Know?

This guy explains BAD PowerPoint:
Comedian Don McMillan

Design
Choose an emotion. Look for images, facts, or quotes to incorporate into your presentation. You can use the links below, or use google searches:

  • Envy  
  • Boredom  
  • Sadness

    • Happiness
      Joy
      Pleasure
      Calm
      Content
      Kindness
      Hope
      Trust

      Images: All images must come from the Copyright free image links on the right
      Quotes: Try searching your emotion and the word "quote." When you include a quote, make sure to attribute it to the author
      Definitions: Start your presentation with a definition of your emotion.

      Requirements:
      Your presentation must be 10 slides or more.
      You must have at least one photo per slide.
      Your presentation should have a cohesive design.
      You will present your PowerPoint to the class.
    •  

    Art Explorations: Exploring Black History Month

    Research
    Part 1: The Children's March film and questions
    Part 2: Choose a famous African American to research and write about. Go to this website: Black History.

    Write
    Write a one-page paper. Use a 12pt point type size and double spacing. Include a title and your name. Your paper must be at least 4 paragraphs. Each paragraph should be about 3 to 5 sentences.
    In your paper answer the questions: 1. Where are they from? 2. How did they grow up? 3. What did they do that was important? 4. How did they change society?
    Ms. Fowler will demonstrate correctly formatting your paper in MS Word.

    Make
    Design a poster for Black History Month.
    1. Choose one of the quotes from your chosen person (they flash at the top of the page).
    2. Follow the directions for designing in Adobe Illustrator
    3. In your design you must: A. Choose an appropriate font. B. Include a picture of the person C. Include their name and title D. Say "February is Black History Month," and Poster by: Your name E. Have color and decorative elements.

    Art Explorations: Typing Practice


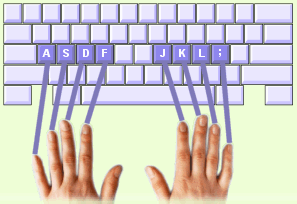
    For this class we need to learn to use technology tools. The first step is knowing how to type correctly.

    1. As a class we will discuss correct posture and placing your fingers on the "home" keys.
    Then try Dance Mat Typing. Keep your volume low. Play just Level 1 (If the link isn't working, try the "Non-flash" version.

    2. Once you have finished. Go to Typing with Booker.

    3. Play Spider Typer

    Welcome to Digital Arts Worksheet

    Follow along with your worksheet and write down the answers.

    Part 1: Procedure

    1. This is the website you go to for ALL of your project directions (playgroundgraphics.blogspot.com). It is the blog that Ms. Fowler makes with all of her classes' assignments.
    Now that you are on the correct website, add it to your favorites so you don't have to re-type it in every time you come to class. Look for the star in the upper left-hand corner of your browser window. Click on it and "add to favorites."

    2. You should hand in your worksheets to the "Hand in work here" basket on the front table at the end of class.

    3. If you finish a project early, you can explore the games and activities linked from this blog (on the right side). If you are on unapproved websites your computer will be locked.

    4. Never shut down the computer by pressing the power button. If your computer freezes, ask Ms. Fowler what to do.

    5. When you start a project, you should save it to your folder right away (the one with your last name). When you are finished with your project you should save it to your folder and the "HAND IN FINAL WORK HERE" folder. At the end of the class we will make a CD portfolio of all of your work. This will include everything that is in your last name folder. The "HAND IN FINAL WORK HERE" folder is where you hand in work to be graded. If you do not save your final projects into this folder, you will get a zero for that project.

    6. Only Ms. Fowler will print your projects.

    7. If you need help, sign up on the white-board, putting your name last. This is so you can keep working while you wait for Ms. Fowler to get to you. You do not need to raise your hand or shout.

    8. Take some time to look through this blog, and visit some of the links on the right hand side. You can right-click and "open in a new tab" so you don't loose your place on this page. Write down three of the links you visited.

    9. In order to view projects only for your class, click the appropriate tag under the post (for example, 7th graders should click the 7th grade tag).

    10. Look at the projects for your grade. Which project looks like the most fun, and why?

    Part 2: Vocabulary

    1. Start by finding technology items in this picture (click) 

    2. Now go to Tekmom and write down the definitions for the following words:
    - browser
    - icon
    - software
    - monitor
    - pixel
    - cursor

    CD Portfolios

    It is nearing the end of the semester, and time for you to create a portfolio so you can take your work with you.

    First we must save all of your projects as an image file. Most of your projects were created in Adobe Illustrator and Adobe Photoshop, only computers with that software will be able to open them (most people do not have Photoshop and Illustrator).
    PART 1
    First we need to save your projects so you can see them on any computer.
    Here is how you do it:
    1. Open each of your projects one at a time
    2. Go to file > Save As > and save it as a JPEG into your portfolio folder. OR you may need to export. Go to File > Export > and export it as a jpeg.
    3. You might not be able to save all of your project as JPEGs. That's okay, but you may not be able to see them on all computers.
    4. If there are projects that you handed in and FORGOT to save into your own folder, you will have to ask Ms. Fowler to transfer the file.


    PART 2
    Now it is time to design a cover for your CD. You can choose to use either Photoshop, or Illustrator. You can design everything on the computer, or scan a drawing in first.

    1. Create a new file that is 5 inches wide by 4.75 inches tall. If you are working in Photoshop, make the resolution 300 dpi.

    2. You must include:
           Your full name
           Your grade
           "Portfolio"

    3. Your design should show your personality. You could include pictures of your artwork. Try different fonts and if you use images from the internet, they must be copyright free (use the links on the right)!

    4. Hand in your design to the "HAND IN FINAL WORK HERE" folder. Ms. Vermeer will print your design in color for your CD.

    Write on the Wall

    Now that you know more about what Digital Arts can be, go to the Digital Art Wall and answer this question:
    What would you like to learn, or what projects would you like to do if you took this class again?

    Extra Credit (When you are done with everything)

    1. Create a "Word Cloud" with words or a poem descibing you wordle.net
    or
    2. Get 10,000 points or more on freerice.com
    or
    3. Make a "Glog" on Glogster. It must have a subject or main idea and include writing and information.
    4. Make an animation on Scratch!

    Show Ms. Fowler when you are done for credit!

    6th Grade Digital Art: Architecture

    During this project you will be learning about Architecture and designing a modern home for a client. First we will look at some of the greatest buildings in history.


    1.  Great Buildings
    Go to Great Buildings. With a partner, look through the buildings and choose one you are interested in learning more about.
    Answer the questions on your worksheet.
    Choose an image and a drawing to present to the class.

    Modern Architecture Video:


    2. Modern Homes
    Now we will look at some interesting and modern home designs.

    Look at these houses, or these modern houses. Or HERE. Choose the house you would most want to live in.

    Answer the questions in your packet.
    *As a class we will discuss the “Great Buildings” and the modern homes you have chosen.

    3. Architecture Basics
    Now let’s learn the basics of architecture. Go to archkidtecture
    What is architecture?
    Who makes architecture?
    Name some of the tools an architect uses:

    4. Drawing a Floor Plan
    Now let’s learn about plans, drawings, and sites.
    What is a floor plan?
    What is an elevation?

    Click on “I want to be an architect!” and answer the questions.
    Activity: You will design a house by making a floor plan.


    Architects draw floor plans to show how buildings will function. What rooms will the building have? Where will they be located? How will you get from one room to another? Where will the windows and doors go? These questions and more are answered by drawing a diagram as seen from above. So grab some paper and plan the layout of a house!

    1. Make a list of all the rooms you think you will need.

    Tip: Graph paper makes it easy to measure the sizes of rooms, doors, windows, kitchen and bathroom fixtures etc. Architects use many different tools to make their drawings neat and accurate. Rulers or "straight-edges" will help you draw straight lines.

    2. You can use simple symbols to make your floor plan easy to read.


    4. Now draw a sketch on scratch paper to decide where you want your rooms and how they will connect. You may want to label your rooms. Then draw a final version on drawing paper or graph paper. Use a pencil and draw lightly so you can make changes.

    5. When you are happy with your drawing, draw over the pencil lines with a Sharpie Ultra-Fine marker to make the floor plan permanent.

    5. Architect Studio 3D
    Frank Lloyd Wright and Designing for a Client
    Learn about architecture and Frank Lloyd Wright through reading and designing a 3D model of a house for a client. Go to Architect Studio 3D to answer the questions on your worksheet.

    6th Grade Digital Art: Super School Lunch


    For this project you will learn about health and nutrition to create a healthy school lunch. You will also pick a theme to create a second crazy school lunch.

    For your CRAZY lunch, you will add pictures of food (or other things) to turn it into a "Super Crazy School Lunch." If you could get anything you wanted when you go through the lunch line, what would it be? Or, is it something disgusting? Is it a romantic school lunch? Is it out of this world?  

    For your healthy school lunch, use what you learn about healthy eating and nutrition to create a healthy school lunch. Make sure you cover all the food groups!
      Follow along on your worksheet
      1. Learn about healthy foods and create a healthy meal HERE
      2. Try playing Dining Decisions
      3. Go shopping for healthy foods and read nutrition labels at the Virtual Grocery Store.
      4. Go to the Fowler folder in you 6th grade class folder. Open the picture of the lunch tray in Adobe Photoshop. Rename it as YourLastNameCrazyLunch (or YourLastNameHealthyLunch) and save it to your folder.
      5. Use Copyright Free images to add to your lunch tray. *Remember, google images may be copyright protected and you cannot use them without permission from the photographer.
      6. Use filters and image adjustments to change the color and look of the photos. You must use at least 5 (the more the better!) different pictures on each tray.
      7. Save both versions to the "HAND IN FINAL WORK HERE" folder.


    6th Digital Art: Legendary Creatures


    Myths and legends have entertained humans for thousands of years. These stories may entertain us, scare us, or teach us lessons.

    You will use Photoshop to create a picture and then write a story about a legendary creature. These creatures are made up, like Bigfoot, the Loch Ness Monster, or the Chupacabra. Use this post to fill out the questions on your worksheet

    1. Start by going to Word Central. Write the definitions for the following words:
    mythological
    legend
    bigfoot
    Loch Ness Monster
    allegory
    fable

    2. Go to this List of Cryptids. Pick three. Write down the names, other names, status, descriptions, locations. Are there pictures?

    3. Fables are made up stories that often have a lesson or moral. Go to this page on Aesop's Fables and chose one to read. Which one did you choose? What is the lesson?

    4. Think up your own Legendary Creature. It may be a combination of lots of animals. It may be very big or very small. It may be from another planet or a time long ago.

    5. First write the legend of your creature on the page provided. Use correct grammar and spelling. In your legend answer the questions: Where is it from? When did it exist? Where has it been spotted? What does it look like? What does it act like? What does it do? What does it eat?

    6. These weird animals or (here) are all fake, and were created using Photoshop. Which is your favorite?

    7. Now you should use Photoshop to create a picture of your creature. You may want to use pictures of other animals. Make your file 8 inches wide by 10 inches high. Set the resolution to 300 pixels per inch.

    P.S. Don't forget what all of your tools do.

    Extra Time Project: Create a Memory Game

    Open a new file in Photoshop. Make it 2 inches by 2 inches squared. Design an eye-catching graphic. Save to the HAND IN WORK HERE folder. We will print two copies in color for a memory game!