7th and 8th Digital Art: District Art Show Posters

Your class has been hired to create advertising for the Columbia Heights District Art Show in the spring. The show will be held at the Silverwood Nature Center and the poster needs to have a "nature and art" theme. Closely follow the directions on your worksheet.

1. Vocabulary
Go to wordcentral.com

2. Research
Look at some of these links for inspiration.

3. Plan
Sketch and plan your design before you begin.

* You MUST include all of the information and text provided in the template Ms. Fowler set up for you. Go to "Julie Fowler" classroom folder, then "Pictures and templates for projects" the "Expressions poster." Open up the Photoshop file (PSD) and look at the text you will need. Make sure to include all of the text in your sketch.

* You MUST use only copyright free images for us to be able to legally print your poster, so if you need photographs, go to one of the copyright-free photo links on the right.
Try searching "Art" or "Nature".

* You can scan in a drawing for your poster.

4. Design
Follow the directions on your worksheet


6th Digital Arts: Typographic Self Portraits

Graphic designers pay close attention to the way letters and words look. They use typography to create interesting designs. For this project, you will use typography (the art of designing or arranging letters and words) in a new way to make a self-portrait!
Vocabulary
Begin by looking up the following words. Go to dictionary.com. Write the definitions on your worksheet.
  1. self-portrait
  2. typography
  3. font
  4. contrast
  5. graphic design
Research
We will look at examples of different fonts and examples of typography in graphic design.
  1. Of the fonts shown, which best reflects your personality?
  2. Look at the design examples. Write down one way you see graphic designers use letters as part of the art, more than just a word.
  3. Write down letters (or numbers or symbols) you may use for the different parts of your portrait.
Create
Create a self-portrait of yourself using only typographic forms (letters, numbers and symbols from your keyboard). 
  1. Open Adobe Illustrator (yellow, "Ai" icon)
  2. Go to File > New, to create a new document. Change the name to "YourLastNamePortrait" (for example FowlerPortrait). Leave the size as "letter."
  3. Use the "T' tool to make a text box. Type different letters and try different fonts.
  4. When you find a letter you would like to use in your portrait, click on the text box with the arrow tool, then go to Type > Create Outlines.
  5. After your letter has been outlined it is easy to change the size, place and direction.
  6. Your portrait should be made in only letters and numbers and use only black and white
  7. Think about how to make it look like you
  8. Save your finished drawing into the "Hand in Final Work" folder. Ms. Fowler will tell you when they need to be finished.

Cyberbullying and Digital Citizenship


1. What is Cyberbullying? A Video Introduction
2. Go to MTV's A Thin Line and answer the questions on your worksheets
3. Watch "Lets Fight it Together." Answer the questions on your worksheet.
4. Look at this example "friendbook" profile and answer the questions on your worksheet.
5. Take the Cyberbullying Quiz
6. Explore some of the resources below


Links to Resources:
NSTeens (Great videos on digital citizenship issues and "real stories")
Digizen (UK)
A Thin Line (an MTV/Facebook collaboration)
WiredKids
Cyberbullying Research Center
STOP Cyberbullying for Tweens
THINKUKNOW (divided by age)
NetSmartz Real Stories (video)

7th Grade Digital Art: Dream Destination Presentation

Pick a city from another country and create a PowerPoint presentation to convince someone to visit. Work in pairs. Follow the directions here, and along on the worksheet.
Research
Use these websites to begin your research and planning:
Wikimapia
Yahoo Travel
Lonely Planet
Orbitz
Hotwire 
Vocabulary 
Go to wordcentral and write the definitions to these words on your worksheet:
presentation, consistent, enhance, evaluate, destination
Planning
Use the internet to research and answer the questions on your worksheet.
Design
Ms. Fowler will give a short demonstration on using PowerPoint. It is important that you pay close attention, but also that you learn on your own! Sign up on the white board for help.
Make sure your design is consistent. You can try using slide design templates. Think carefully about the colors and the fonts you choose. Do they match the style of the place?
Present and Evaluate
You will present your presentation to the class at the end of the project. Remember, PowerPoint presentations are meant to enhance what you are saying. The slides are there as a background for what you say. Work with your partner to prepare your presentation.
How NOT to use PowerPoint
You will fill out a self-evaluation. You will also complete a written evaluation of two to three other presentations.
Have fun!

8th Digital Art: Dreamscapes

You will turn an ordinary landscape photo into a dreamscape. Use Photoshop to make your landscape look surreal, and more than just a photograph.

S T E P S
Vocabulary
1. Look up the definition of "landscape" on WordCentral. Write down on your worksheet.
2. Your art work must include a focal point. Go to this website and read about focal points. Write down the definition to focal point.
3. Write one way to create a focal point
4. Your art work must use complimentary colors. Go to this website to read about color. Find the section on complimentary colors.Write the definition.
5. Write down 2 complimentary colors you will use.

6. Look through these links of dreamscape images:
     Link 1
     Link 2
     And search for some on your own.

Design
1. Find a landscape photo from one of the Copyright free links. Save it to your folder.
2. Open your photo in Photoshop.
3. Save it right away as YourLastName Dreamscape.tif
4. Change your photo by using image adjustments, filters, and transparency. Create a dream-like or nightmare like photo. Think of it like a painting done on the computer.


When you are done, and it looks really good, save it to the HAND IN WORK HERE folder!

6th Digital Art: Emotion PowerPoint

You will work with a partner to create a PowerPoint presentation on an emotion. You will discover how to visually represent an emotion with related images and words.

Presentations don't have to be boring! For this project we will use PowerPoint to make a presentation that is interesting, artistic and entertaining.

Vocabulary
go to Word Central to find the definitions for the following words.
presentation:
emotion:
represent:
visually:
consistent:

Research
Here is an example of a good PowerPoint:
Did you Know?

This guy explains BAD PowerPoint:
Comedian Don McMillan

Design
Choose an emotion. Look for images, facts, or quotes to incorporate into your presentation. You can use the links below, or use google searches:

  • Envy  
  • Boredom  
  • Sadness

    • Happiness
      Joy
      Pleasure
      Calm
      Content
      Kindness
      Hope
      Trust

      Images: All images must come from the Copyright free image links on the right
      Quotes: Try searching your emotion and the word "quote." When you include a quote, make sure to attribute it to the author
      Definitions: Start your presentation with a definition of your emotion.

      Requirements:
      Your presentation must be 10 slides or more.
      You must have at least one photo per slide.
      Your presentation should have a cohesive design.
      You will present your PowerPoint to the class.
    •  

    Art Explorations: Exploring Black History Month

    Research
    Part 1: The Children's March film and questions
    Part 2: Choose a famous African American to research and write about. Go to this website: Black History.

    Write
    Write a one-page paper. Use a 12pt point type size and double spacing. Include a title and your name. Your paper must be at least 4 paragraphs. Each paragraph should be about 3 to 5 sentences.
    In your paper answer the questions: 1. Where are they from? 2. How did they grow up? 3. What did they do that was important? 4. How did they change society?
    Ms. Fowler will demonstrate correctly formatting your paper in MS Word.

    Make
    Design a poster for Black History Month.
    1. Choose one of the quotes from your chosen person (they flash at the top of the page).
    2. Follow the directions for designing in Adobe Illustrator
    3. In your design you must: A. Choose an appropriate font. B. Include a picture of the person C. Include their name and title D. Say "February is Black History Month," and Poster by: Your name E. Have color and decorative elements.

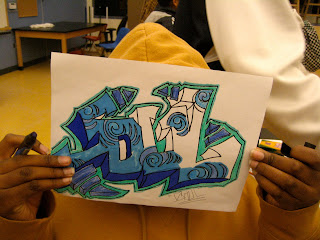
    7th Digital Art: Graffiti


    1. 7th Graders: Watch the presentation and fill out the worksheet.
    2. Videos:
    Hector Calderon 
    How to draw Wildstyle
    3. Sketch some design ideas.
    4. There are different styles of graffiti art. You can google image search these typse: "wildstyle," "throw-ups," "bubble letters," and "block letters"
    5. Look at these links for inspiration:
    Best Graffiti sites
    MOGA
    Decorative Letters
    6. You can also try the Graffiti Creator
    7. Pick one of your three designs to draw full size for our room's brick wall. Make sure it is eye-catching, carefully made, and interesting to look at!
    8. When you are finished turn in your worksheets and final design to Ms. Fowler.

    Art Explorations: Typing Practice


    For this class we need to learn to use technology tools. The first step is knowing how to type correctly.

    1. As a class we will discuss correct posture and placing your fingers on the "home" keys.
    Then try Dance Mat Typing. Keep your volume low. Play just Level 1 (If the link isn't working, try the "Non-flash" version.

    2. Once you have finished. Go to Typing with Booker.

    3. Play Spider Typer